
Polysynth development and the Arduino Due, part due
So much has happened in the recent weeks.. Where to start?
First off, we’re making a new synth. A full-blown polyphonic, with loads of special features you’re unlikely to encounter in any other device. This time not only intended as a demonstrator, but as a unit suitable for mass production, and as portable and sturdy as you can imagine. This project is a collaboration between Tasty Chips and STU.
We don’t want to reveal too much, but we can say it’s getting there. We’re building all of this around the Arduino Due, much like the TCE-1M. The Due is so powerful that it can do 8 polyphonic voices with multiple oscillators per voice. For this synth, though, we want to keep it limited to 4 and leave some room for other more exotic features.
PWM + low-pass filter = DAC
The Due has PWM, which is faster and potentially has more resolution than the Uno. As told in previous posts it’s no problem to crank it up to 300 kHz 8 bit.. or 20 kHz 12 bit. Combining two PWM pins using carefully picked resistors, it’s possible to make 2 x 8 = 16 bit DAC’s, using a simple analog anti-aliasing filter behind it.
The Due’s SAM3X micro controller is a true powerhouse. Almost all of its pins are multiplexed, which means they have multiple functions. It turns out you can have way more than the 12 advertised PWM’s. In reality, you can have 4 more.. and now comes the best part.. all of them have complementary pins. That’s normally used for H-bridges and power electronics control where pulses should be complementary but non-overlapping.
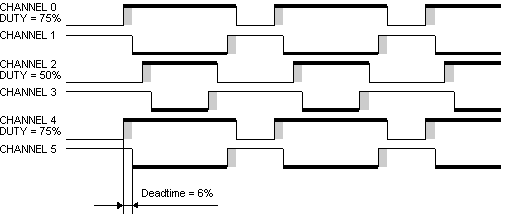
This non-overlap is controlled by so-called “dead time”. And this dead time is a user-specified variable per pin. So, just set your PWM complementary pair to 50% and vary the dead time on both. you lose 1 bit of resolution, but you gain 14 additional PWM pins. This means you can have a total of 15 audio DAC’s excluding the two already onboard DAC’s. How’s that for a digital oscillator bank!
Of course, all of this should be tested in detail. Using the PWM DAC’s in 8 bit mode was a
success, but there might still be problems with making it 16 bit. We’ll just have to see.
In any case, the SAM3’s PWM power is the reason we stayed Atmel/Arduino, instead of going for the hugely popular STM32. STM32 is multiplexed in a way that does not allow usage of SPI alongside PWM. Very disappointing for an otherwise great micro controller. You just need PWM’s if you’re going to do anything with analog synthesizers. There’s just no way around it.
Atmel SAM3X – The Powerhouse
The SAM3X never ceases to amaze us. While it has bad sides (which are also amazing ;)) like pins that burn out a bit too easily, it has so many good things to make up for it. And each day we discover more. For instance.. instead of the Arduino’s digitalWrite() call to set a pin high or low, you can just write:
//  digitalWrite(13,HIGH);

  PIOB->PIO_SODR = 1<<27;

//  digitalWrite(13,LOW);
  PIOB->PIO_CODR = 1<<27;
A digitalWrite() call is typically 1 microsecond (!) It's direct replacement, however, is only a few cycles!! As you can see these are writes to 2 different registers. One is the Set register, the other the Clear register. This allows the programmer to use only a single write access to the bus instead of the typical read-modify-write.
DMA is the other thing that the SAM3X excels. DMA, or Direct Memory Access, was considered a luxury for a long time in the world of the PC, and for an even much longer time in the embedded world. It's an ideal solution to copy data to/from peripherals without using up costly CPU and also avoiding complex interrupt prioritization designs where timer ticks go missing and all manner of nastiness might ensue.
The SAM3's DMA comes in two flavors:
- DMAC, the standard DMA Controller: extremely flexible and fast
- PDC, the Peripheral Device Controller: slower, but very easy to use
Just about anything can be transmitted over the DMAC, and it also has 6 channels. If you want to periodically send out 32 GPIO inputs to a serial bus or dump them to a memory block. It can do that for you. If you want to send out periodic SPI commands and read back their response.. it can also do that. It can do everything. It can even do linked lists.. running a sequence of transfers completely without CPU intervention. The DMAC is just extremely powerful. More akin to what you'd like to find in your mobile hardware, than on a cheap embedded device.
The PDC is simpler and is specialized for cyclic transfers. While the DMAC is always disabled after transfers complete, you can just pass the next source and destination to the PDC in an interrupt handler. It will continue to these next addresses without any bump or delay. It is slower, but can still do a few megabyte per second. It can be used to read out the ADC periodically, drive the DACs in the same way and also to read out USB at relatively high speed.
Hardware development
Next to the digital oscillator engine, there's the design of all the hardware. 2 out of 4 PCB's have already been laid out and are being feverishly tested and coded on. The focus is on hands-on control. Getting a good, solid and direct user experience as early on in the project. In those terms, some PCB's are easier than others. One contains only a bunch of potentiometers, while others contains a host of buttons, LEDs, rotary encoders, and even a display.. yes..
The Voltage Controlled Filter (VCF) is analog. Yes, this is a hybrid synth after all. We chose to abandon the mutated Steiner-Parker filter from the TCE-1M for a new design that is
very close to signal processing theory and has everything voltage controlled: even the resonance. And of course, it is multi-mode (lo, band, hi, possibly even more). The core is realized on breadboard and it sounds fine. It can be really really resonant without going into self-oscillation. But also, it could be able to do self-oscillation for all the analog nuts out there.. if you really push it. But this is something we need to work on, still.
All-in-all, we estimate it should still take a month before a workable prototype emerges. We'll keep you updated!
More reading:
The rather excellent SAM3X user guide is available here: Atmel SAM3X User Guide