
Sawbench Owner’s Manual and specifications
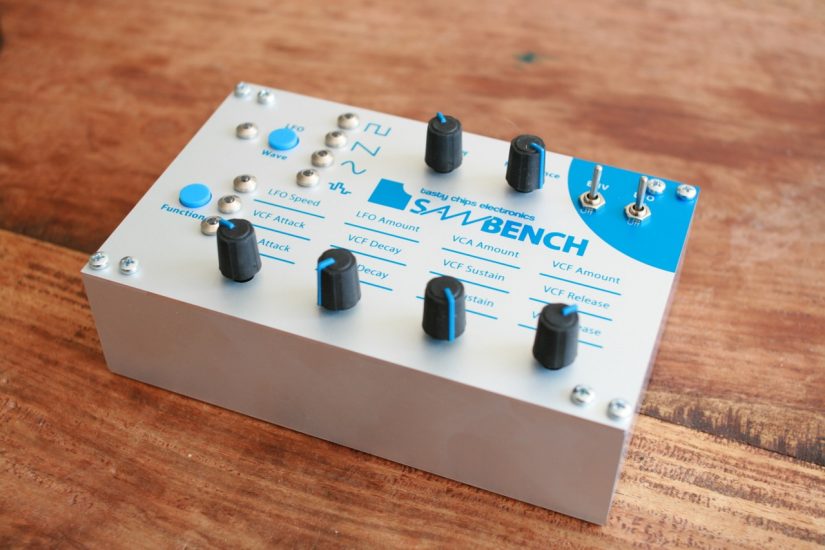
Congratulations! You are now the proud owner of a fully assembled Saw Bench Synthesizer, or you assembled it yourself. Either way, you should be ready to use it now.
Main Features:
VCO (saw, 4 Hz – 4 kHz (LFO range – around the highest piano note))
VCF (four pole low-pass, diode ladder)
VCA (80 dB)
Frequency Modulation
LFO (four wave forms, 200 mHz – 20 Hz)
2 ADSR Envelopes
Direct control: 6 rotary knobs, 2 buttons and 2 toggles
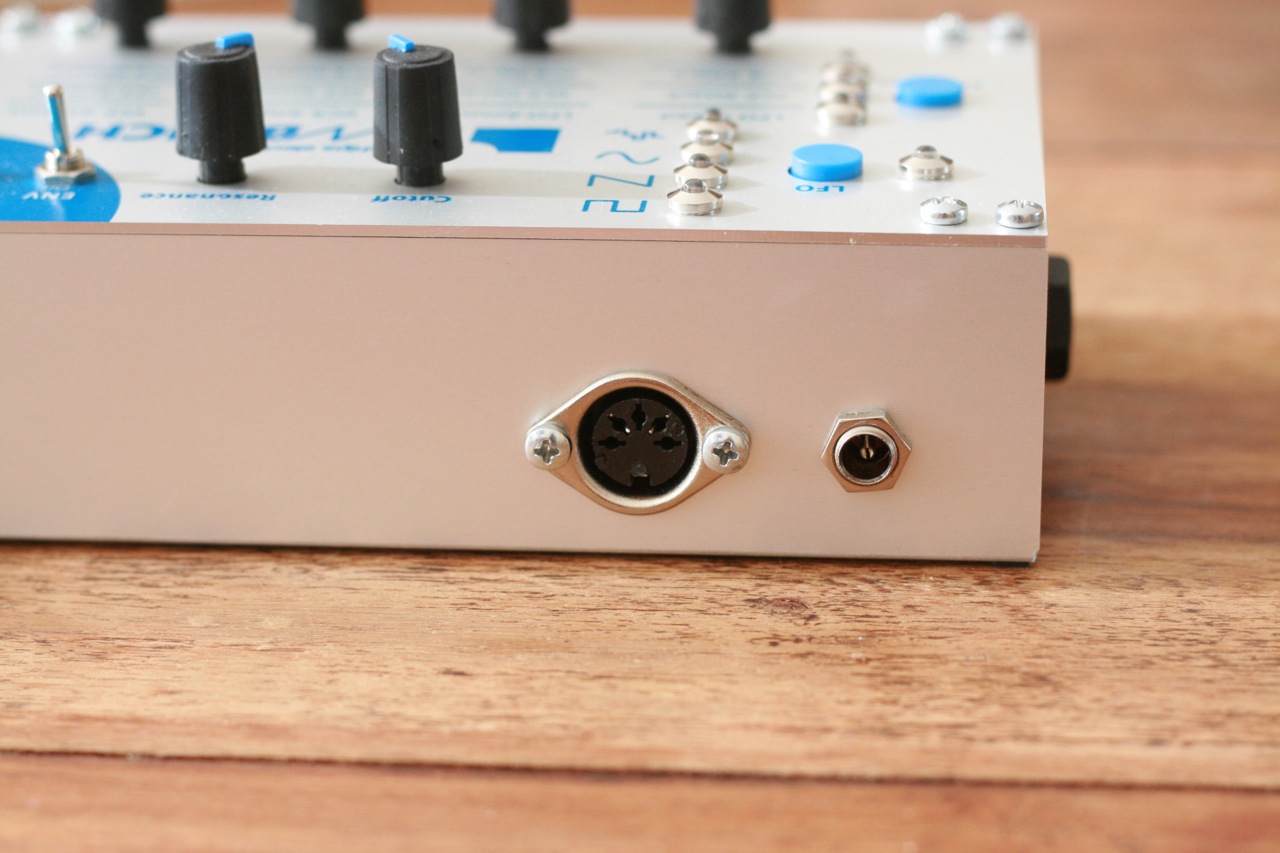
Interfaces:
Power Supply:
9-12V DC, 2.1mm, center positive, 1A or more
MIDI input:
DIN-5, full size
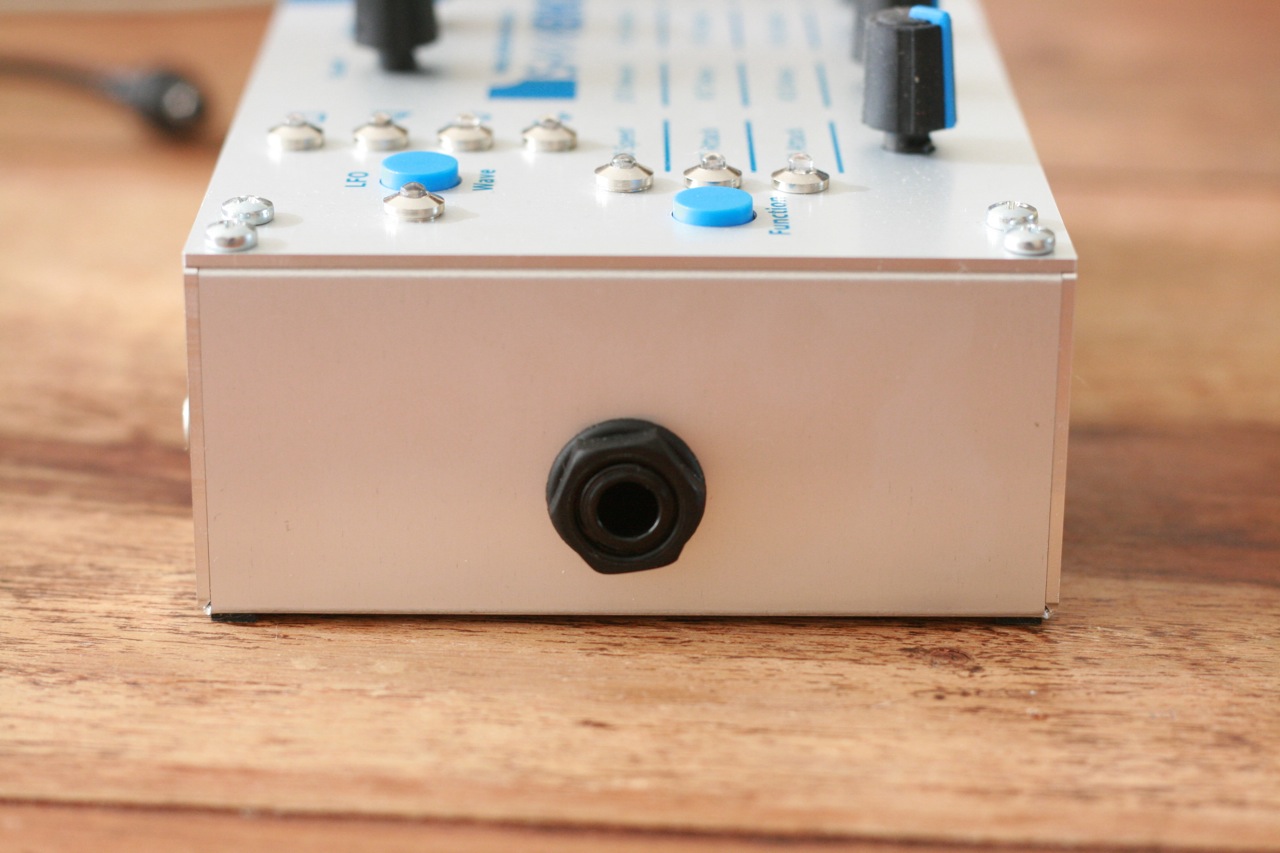
Audio out
6.35 mm phono jack, line output (-cannot- drive a headphone!)
Hooking up:
Hook MIDI out of your MIDI device up to the DIN-5 port on the back side of the Sawbench. A MIDI controller or keyboard are preferred for the first quick test.
– Ableton Mac + Focusrite Saffire pro 40
– Ableton Mac + Focusrite Saffire LE
– AKAI MPK25, MPK49
– Arturia Beatstep
– Atari ST running custom step sequencer
– Casio HT-700 😉
– Kawai K4
– Midistart2
– Renoise Mac + M-AUDIO USB UNO
– Roland PC-160A
– Yamaha RM1X
– Yamaha SY-35
Hook up Audio output using the 6.35 mm phono jack on the left side of the Sawbench. This can be either a mixer or an amplifier. Be sure to turn it up a little.
The Sawbench requires a suitable DC power supply like specified above. Hook it up to the power jack on the back side. NOTE: Supply plug must be center-positive. wrong polarity may result in permanent damage to the internal regulator!
If everything’s right the Sawbench should show a little introduction: It should start scrolling through the LEDs faster and faster, and eventually they will stop and settle. Then, after one second, the LFO LED should start pulsing. This means the Sawbench has calibrated its VCO and is now ready to receive MIDI input!
Manual controls:
Now that the Sawbench is up and running, it’s time to make some sounds!
First of all, take a look at this overview of the manual controls:
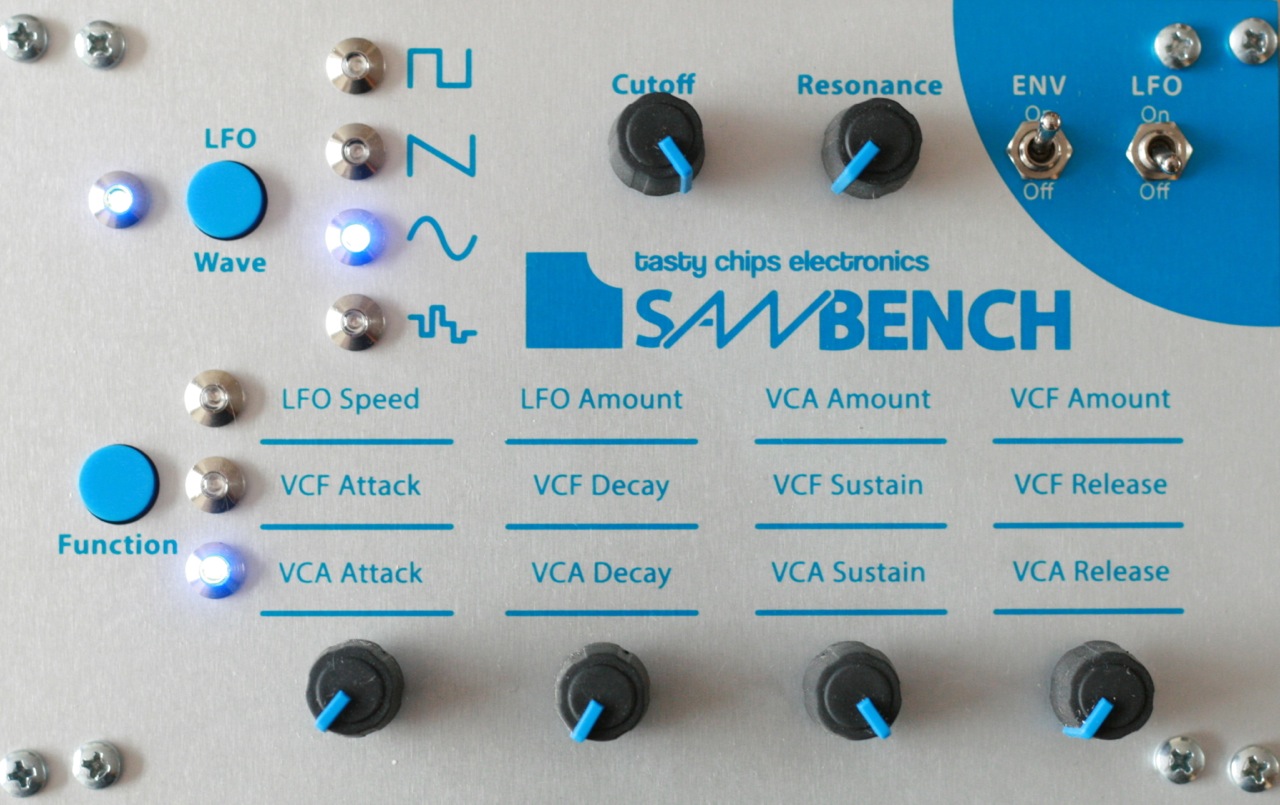
The knobs are the usual type: turned completely to the left means it’s off or closed or zero, while completely turned up the right means it’s maximum.
As you can see there are cutoff and resonance controls on the top. Just turn the cutoff completely to the right (what we like to call “open”), which means the filter cutoff is at maximum and hence will not filter out any frequencies from the sound. I.e. you will actually be able to hear notes! Wow!
In the same way, you can set VCA Attack (the bottom-left knob) to zero. Set VCA Sustain (again a knob in the bottom row, the one just left of the rightmost) to full.
See the picture above if you’re lazy and don’t like to read.. These settings are also how the Sawbench is configured in the factory.
Then.. hit a key on your MIDI controller.. And you should be hearing notes play. How nice! If you don’t: feel free to visit the forum or write us an e-mail at info@tastychips.nl.
Not a bad start.. now for the rest.
Feature-by-feature and step-by-step overview
Now for a more detailed overview. Below you find the a schematic of the signal path.

VCO (Voltage Controlled Oscillator):
Short:
The VCO on the Sawbench is a Sawtooth oscillator.
The pitch is controlled by MIDI (note on + pitch bend). There is also an option to add Frequency modulation using MIDI : modulation wheel + CC.
Detailed:
All synthesis starts with oscillation. In this case we have just one true analog VCO which can generate just one type of wave: the sawtooth. The sawtooth is ideal for filtering, as it has many harmonics.
As you have already found out the VCO pitch is controlled via MIDI note on/note off and may also be influenced by several other MIDI commands: pitch bend, modulation wheel and glide. The modulation wheel controls Frequency Modulation (FM). FM may be used to generate a whole range of sound effects: growling bass, overdrive-like effects, and oldschool telephone type sounds.
VCF (Voltage Controlled Filter):

Short:
The VCF on the Sawbench is a four pole diode ladder low-pass VCF.
Cut-off:
Manually controlled
Controlled by envelope 2
Controlled by LFO
Resonance:
Manually controlled
Detailed:
After the VCO has created a sawtooth wave at the desired pitch, this signal is then filtered by the Voltage Controlled Filter (VCF). The filter for a large part defines the character of the sound. Since the sawtooth has so much harmonics, a slight change in cutoff frequency is immediately noticed. The VCF is a 4-pole diode ladder filter with high resonance. The diode ladder has the characteristic sound of the classic EMS or 303 synths. Resonance may be used to make it squeel or whistle.
The VCF is controlled primarily by the on-board (manual) controls of the Sawbench. This includes manual cutoff, manual resonance, Low Frequency Oscillation (LFO) and envelope controls. The VCF also has keyboard pitch tracking, which can be influenced via MIDI (see MIDI CC table at the end). Overall, the VCF has a large amount of controls for filter sweeps.
The typical wawa and slapped bass sounds are of course possible, but utilizing looped envelopes quite crazy drones can be made as well. To top it all of, it’s possible to turn off filter envelope sweeps when playing legato (that is, glueing together of notes). See the section about ADSR envelopes further on.
VCA (voltage controlled amplifier):
Short:
The VCA is an amplifier controlled by envelope 1 and by MIDI velocity.
Detailed:
The VCA is an analogue amplifier based on the LM13700. This allows for a high dynamic range (80 dB) and good linearity.
The amplitude of the VCA = (roughly) MIDI amplitude * envelope
(The MIDI amplitude is computed from MIDI note on velocity.)
Note that the VCA envelope can also be looped. For more information see the envelope section further on in this manual.
LFO (low frequency oscillator):
The LFO can be turned on/off by the LFO toggle switch.
The switch has the following states:
ON state:
The LFO now modulates the VCF cut-off.
OFF state:
The LFO is now bypassed.

Waveforms:
Different waveforms can be selected using the wave select button.
Using this button you can scroll trough the waveforms. The 4 LED’s next to the button indicate which of the following waveform is selected:
1: Random (sample-and-hold alike)
2: Sine wave
3: Sawtooth
4: Square wave

The frequency and amount of the LFO can be set manually. See the “Function” button explanation for more info.
Envelope (ADSR):
There are 2 Envelopes on the Sawbench. Both envelopes are triggered by MIDI note on information. They are scaled by MIDI velocity and the amount knob in state 3.
The envelope uses the classic ADSR (Attack Decay Sustain Release) model. ADSR envelopes on Wikipedia. The knobs at the bottom of the Sawbench (TODO: picture) individually control the ADSR parameters.

Envelope controls use a cubic function. We feel it’s better than an exponential function, as it allows for smoothness through the entire range of operation. This applies for the manual controls (knobs) as well as MIDI.
Envelope 1:
This envelope controls the amplitude of the VCA.
See the “Function button” explanation for more info on how to control ADSR + amount.
Envelope 2:
This envelope modulates the Cut-off of the VCF.
You can bypass this using the ADSR toggle switch.
See the “Function button” explanation for more info on how to control ADSR + amount. Envelope 2 can be kept on its sustain when multiple notes after played (glued) after eachother. See the legato MIDI CC in the table below.
Note that both envelopes can be set to looping mode by using a MIDI CC (see table below).
LFO and amount controls:
LFO amount: controls LFO depth, linear
LFO speed: controls LFO speed, linear (0.2 Hz minimum)
VCA amount: controls VCA envelope amplification, linear
VCF amount: controls VCF envelope amplification, linear
The Function button:
The Function button can scroll trough different states.
The 3 LED’s next to this button indicate which state is selected.
The 4 rotary knobs have different functions in each state (see pictures and table below).

| Knob | State | Function |
|---|---|---|
| Knob 1: | 1 | VCA attack envelope |
| Knob 2: | 1 | VCA decay envelope |
| Knob 3: | 1 | VCA sustain envelope |
| Knob 4: | 1 | VCA release envelope |
| Knob 1: | 2 | VCF attack envelope |
| Knob 2: | 2 | VCF decay envelope |
| Knob 3: | 2 | VCF sustain envelope |
| Knob 4: | 2 | VCF release envelope |
| Knob 1: | 3 | LFO Speed |
| Knob 2: | 3 | LFO amount |
| Knob 3: | 3 | VCA envelope amount |
| Knob 4: | 3 | VCF envelope amount |
Supported MIDI commands and controls:
The Sawbench listens to MIDI data on channel 1 (some customers got it set to a channel of their choice, though!). It supports note on/off, pitch bend and a wide range of control changes. Everything that can be changed by the ADSR knobs and on-board LFO controls can also be done with MIDI. Furthermore, it also allows parameters which are not changeable by on-board controls (VCF keyboard tracking, for instance). See the table below:
| SAWBENCH command | MIDI control number (hex, dec) | Value information |
|---|---|---|
| Modulation depth (FM) | 0x01, 1 |
0: no modulation, 100: full modulation, >100: over modulation |
| Relative modulation frequency (FM) | 0x0C, 12 |
127 = 0.99 * note pitch, 64 = 0.5*note pitch, 0 = off |
| Envelope 1 (VCA) attack time | 0x49, 73 |
0=0.0s .. 127=4.0s |
| Envelope 1 (VCA) decay time | 0x4B, 75 |
0=0.0s .. 127=4.0s |
| Envelope 1 (VCA) sustain level | 0x50, 80 |
0:Mute .. 127:Max |
| Envelope 1 (VCA) release time | 0x48, 72 |
0=0.0s .. 127=4.0s |
| Envelope 2 (VCF) attack time | 0x51, 81 |
0=0.0s .. 127=4.0s |
| Envelope 2 (VCF) decay time | 0x52, 82 |
0=0.0s .. 127=4.0s |
| Envelope 2 (VCF) sustain level | 0x53, 83 |
0:Mute .. 127:Max |
| Envelope 2 (VCF) release time | 0x54, 84 |
0=0.0s .. 127=4.0s |
| LFO speed | 0x55, 85 |
0.2Hz – 20Hz |
| LFO amount | 0x56, 86 |
0:Mute .. 127:Full |
| Envelope 1 (VCA) amount | 0x57, 87 |
0:Mute .. 127:Max |
| Envelope 2 (VCF) amount | 0x58, 88 |
0:None .. 127:Full |
| VCF keyboard tracking | 0x59, 89 |
0:None .. 64=1.0 .. 127=1.99 |
| LFO wave form | 0x5A, 90 |
0:random, 1:sine, 2:saw, 3:square |
| Glide speed | 0x5B, 91 |
0:Play previous note(lol), 1:slowest .. 127:instantaneous |
| Legato | 0x5C, 92 |
0:off (always trigger env), 1:on (only trigger in case no other notes are pushed) |
| Looping ADSR | 0x5D, 93 |
0:off, 1:VCA loop, 2:VCF loop, 3:VCA and VCF loop |
| Linear/exp envelopes (v1.2 onwards) | 0x5E, 94 |
0:VCA and VCF linear, 1:VCA exp / VCF lin, 2:VCA lin / VCF exp, 3:VCA and VCF exp |
Tips for effectively using MIDI:
While it’s true that there’s no filter cutoff CC, there is a VCF keyboard tracking CC. This will also effectively shift the cutoff frequency, only in a relative way. Try it!
While running an automated live setup: It’s probably a good idea to control a single “Function” on the Sawbench itself manually, for instance the VCA envelope.. and leave the MIDI sequencer to do LFO speed/depth and VCF envelope parameters.
Frequency modulation can be a tricky beast. To get it to growl correctly it might be necessary to play around with the relative modulation frequency (CC 12). Not all Sawbench VCO’s are identical, due to small variations in the analog circuitry. Some may be digitally tuned higher or lower and the FM system is unaware of this, so may need some tuning over MIDI. This tuning can also be used to make it growl in lower or in higher octaves, if you like.
The glide CC may be used to achieve the typical TB303 acid sound or sliding bass effect.
Troubleshooting:
Firmware v1.0 is known to have serious MIDI problems, especially with high data rates. Version 1.1 solved this problem, but still it didn’t support MIDI clock commands. Version 1.2 does support them. In case of missing notes gone missing: please upgrade. We supply sawbench microcontroller chips with the latest firmware in our shop MCU with latest firmware, or you can use the Arduino IDE and upload the code yourself: Sawbench firmware on Github.